Toolchains For Eclipse Mac
Guide to Using Toolchains What is Toolchains? The Maven Toolchains provide a way for plugins to discover what JDK (or other tools) are to be used during the build, without the need to configure them in each plugin nor in every pom.xml, or forcing a precise location among every machine building the project.
Eclipse
Here, we cover installing and using Eclipse on Windows. (Pretty much the same instructions can be used to download and install Eclipse on Mac.) We assume thatyou already have a valid GCC installation.
Eclipse is an integrated development environment (IDE) that provides a graphical user interface (GUI) to develop and debug your code. Eclipse is not as fully featured of an IDE as Microsoft Visual Studio, but has the advantage that it is both cross-platform and free to use.
Pre-requisite: Java Runtime Environment
Eclipse is a Java application and requires the Java Runtime Environment (JRE) to run. You can download this from the Java downloads website. Select 32-bit if you are on a 32-bit version of Windows and 64-bit if you are using a 64-bit version.
Install the JRE (pay attention during the installer, it will likely want to install an ASK toolbar which you probably don't want) and test your installation by typing
at the command line. If you get back some information about your Java version, you have installed the JRE correctly.
If after installing the JRE, it does not add itself to your PATH, then java -version gives an error. In that case, follow the PATH instructions on the Java website and add the location of the bin folder within your Java installation to the system PATH. See also our page on environment variables.
Get Eclipse
Download the latest version of the Eclipse CDT (C/C++ Development Tooling) from Eclipse CDT Kepler (download links will appear on the right). Make sure to install the 32-bit version if you are using a 32-bit Windows installation and the 64-bit version if on Windows 64-bit.
If you do not install the version for the same architecture type (32 vs. 64 bit) as you did for Java, you will get an error when you attempt to run Eclipse for the first time. If you encounter this, double check that you have the same (32 or 64 bit) versions of the JRE and Eclipse installed, and that they are correct for your Windows version.
Install Eclipse
Since Eclipse is a Java application, it does not need to be explicitly installed on your system. Simply unzip the downloaded file and place it wherever you would like Eclipse to exist. If you wanted Eclipse to live amongst other installed programs, you could create an Eclipse folder in C:Program Files or C:Program Files (x86) (depending on your computer architecture and the version you downloaded) and unzip the contents there.
Troubleshooting
If Eclipse complains about not being able to find a Java Runtime Environment, you most likely installed different versions (32 vs. 64 bit) of Eclipse and the JRE. Make sure you install the same type for both of them.
Configuring Eclipse on a Mac
This section of the guide assumes you've already read and followed the Eclipse setup guides. To make sure that Eclipse uses the compiler that you just set up properly and not any other (for example, XCode includes a really old version of GCC), we need to configure some settings.
One-time: Setting PATH Variable
This change only needs to be applied once. We will need to tell Eclipse where we installed our compilers. First, let's find out where GCC is installed. Run the following command in Terminal:
It should look something like /usr/local/bin/gcc-4.8. Copy the path before /gcc-4.8, that is, /usr/local/bin.
- In the Menubar, find 'Eclipse', then 'Preferences'.
- In the sidebar of the Preferences window, find 'C/C++', then 'Build', then 'Environment'.
- Press 'Add' on the right.
- Put
PATHunder 'Name', and what you just copied (usr/local/bin) under 'Value'. - Press OK.
- Make sure 'Append variables to native environment' is checked.
Per-project: Setting the Compiler
This change will need to be applied every time you create a new project under Eclipse. We need to specify the compiler to be used for compiling our program.
- In the 'C/C++ Projects' pane, find your project. Right click on it, and press 'Properties'.
- In the sidebar of the Preferences window, find 'C/C++ Build', then 'Settings'.
- Change the 'Command' of each of the tools from
gcctogcc-4.8, andg++tog++-4.8. - Press OK.
A first simple Eclipse Project
This section will explain how to create and compile a simple program using Eclipse CDT.
Kh-886 usb lan drivers for mac. Please visit the ASUS USA and ASUS Canada websites for information about locally available products. Products certified by the Federal Communications Commission and Industry Canada will be distributed in the United States and Canada.
Creating a Project
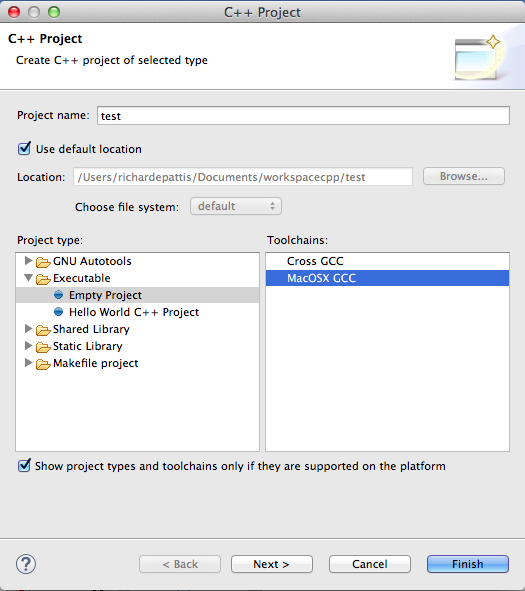
After starting up Eclipse, you can create a new project by selecting 'File', then 'New', then 'C++ Project'. By default, projects will be created in wherever you set up your workspace to be when first starting Eclipse, placed inside of folders named the same as the project. It is slightly tricky, but you should soon learn, how to work with an existing directory structure, like your git folder.
Select 'Executable', then 'Empty Project' for the project type and 'Cygwin GCC' for the Toolchain. If you do not see 'Cygwin GCC' in the Toolchains list, you likely did not add it to your system PATH variable. Ultimately your project creation should look something like this:
Enabling C++11 Support
C++11 is the latest standardized version of the C++ programming language and introduces several new features aimed at improving the language. If you would like to enable support for C++11 in eclipse, you must do the following after creating a project:
- Right click your project and select 'Properties'.
- Select 'Configuration', then 'All Configurations'.
- Go to 'C/C++ Build', then 'Settings', then 'Tool Settings', then 'Cygwin C++ Compiler', then 'Miscellaneous' and finally 'Other Flags'. Add
-std=c++11there. - Go to 'C/C++ General', then 'Paths and Symbols', then 'Symbols', then 'GNU C++', and finally 'Add..'. Type or copy '__GNU_EXPERIMENTAL_CXX0X__' (two underscores leading and trailing) into the 'Name' field, leaving 'Value' blank.
Your First Program
To add a new source (.cpp) file to your project, expand your project in the 'Project Explorer', right click your project, and select 'New', then 'Source File'. For this example, we will name the file main.cpp.
Eclipse will auto-generate some documentation at the top of your newly created file. You can expand or collapse this by clicking the small plus sign + in the margin. You can now add a simple file, like the following:
Compiling a Project
C++ programs need to be compiled before they can be run. To compile a program in Eclipse, you can do any of the following (be sure to save your work first):
- Click on the hammer icon in the quick access toolbar.
- Select 'Project', then 'Build All'.
- Press CTRL + B.
If you have any errors in your code, the 'Console' will display the error and warning output from the compiler. You can also view these by going to the 'Problems' panel at the bottom of your screen. If everything compiles correctly, you should have no errors in your 'Problems' panel and see 'Finished building target' in your 'Console'.

Running Compiled Code
To run a successfully compiled program in Eclipse, do any one of the following:
- Click on the play button in the quick access toolbar.
- Select your executable in the 'Binaries' folder of your project, right click, and select 'Run As', then 'Local C/C++ Application'.
- Press CTRL + F11.
Before setting up your toolchain preferences, make sure that all the below software packages have already been downloaded and installed.
Refer to Installation Guide and CLion Quick start guide.
File Settings Build,Execution, Deployment Toolchains for Windows and Linux
CLion Preferences Build,Execution, Deployment Toolchains for macOS
Use this page as the reference when creating a toolchain. See also Toolchains for CMake projects.
Toolchains list
Here you can create or delete a toolchain and modify an existing one:
- use button to create a new toolchains configuration.
- use this button to delete a selected toolchain.
- use this button to move the selected toolchain up in the list.
- use this button to move the selected toolchain down in the list.
Toolchain name and type
Item | Description |
|---|---|
Name | Specify the toolchain name. |
Type (Linux and macOS) | Choose from the drop down list:
|
Environment (Windows)
Select the preferred environment from the drop down list:
Item | Description |
|---|---|
MinGW | Choose this item to use MinGW. In the text field, specify the path to the MinGW home or use the one detected by CLion. |
Cygwin | Choose this item to use Cygwin. In the text field, specify the path to the Cygwin home or use the one detected by CLion. |
Visual Studio | Choose this item to use Microsoft Visual C++ compiler. In the text field, specify the path to the Microsoft Visual Studio home (for example, C:Program Files (x86)Microsoft Visual Studio 14 .0). To do that, use one of the following ways:
In the Architecture, Platform, and Version fields, specify the architecture (x86, amd64, x86_arm, amd64_arm, etc), type of a platform (store, uwp, onecore, or leave it blank) and version (Windows SDK name or leave it blank). |
WSL | Choose this item to use the WSL toolset. Select the automatically detected path to WSL distribution from the drop down list. Credentials - this field represents the SSH credentials that will be used to work with the selected WSL distribution. Click the button to configure credentials such as username, password and port. User name and password should be the same as you entered during the WSL set up procedure. |
Remote Host | Choose this item for Remote Development. In the Credentials field, provide the remote host credentials. |
CMake
Item | Description |
|---|---|
CMake | Specify the path to CMake home directory, bundled or custom. |
Make | Specify the path to the Make utility or use the one detected by CMake. |
C Compiler | Specify the path to the desired C compiler or use the one detected by CMake. |
C++ compiler | Specify the path to the desired C++ compiler or use the one detected by CMake. |
Debugger
Item | Description |
|---|---|
Debugger | You can switch between the bundled GDB (currently v 8.0.1 for macOS, v 8.3 for Windows and Linux) and LLDB (version 9.0, only on macOS or Linux) or choose a custom GDB. |